profile image

Kevin LaBranche

Teacher @

Our team has over 100 different repositories (applications) with pipelines and release definitions in Azure DevOps.  We have many on-premise web servers that share hosting the applications.  With this setup we have taken advantage of using Library / Variable Groups to share settings that are reused.  In our team we recently “rediscovered” a little gem in how Azure DevOps works with library variables / variable groups, stages and Release scope.  I wanted to share as there was confusion in the team that was adding unnecessary pipeline variable setup.

Pipeline Variables

Given a three stage pipeline like dev->test->prod and you need to define a variable:

three-stage-release

pipeline-variables

For a variable that is the same for all stages, use the Release scope. AppSettings.AppName for example in the above snippet doesn’t change for the stage.

For a variable that is different for each stage, define it three times, setting the value differently per the stage.

Straight forward, no fuss.  What about variables groups?

Variable Groups

Every release definition of ours has variable groups that describe the iis deployment information such as the root folder path for where we “install” the application folder and other IIS information that we have normalized for all the applications on that host (deployment group and/or environment).  We also have settings for our single sign on system that all the applications use and it’s settings for the various stages (dev/test/prod).

If the information for each stage does not change then we could pick the Release Scope when we setup the Variable Group.  Straight forward, no fuss.

If you are using variable groups scoped to a stage then do you have to declare the variable per stage, three times (dev/test/prod)?

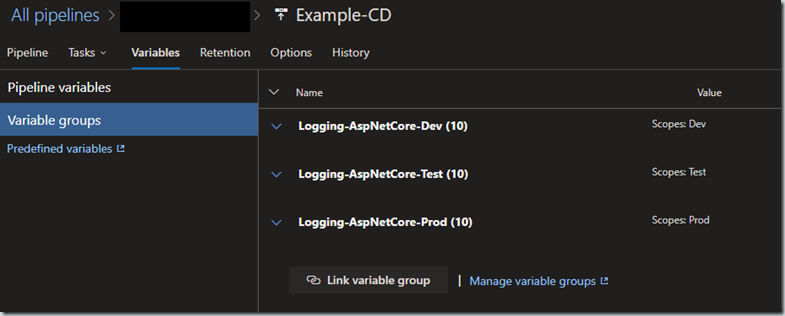
Below, we have hooked up variable groups to each stage (dev/test/prod) for our .Net Core apps logging settings.

sample-variable-group-to-stages

So do you create three pipeline variables, one per stage in the pipeline variables?  Since the values are different and/or scoped to the stage, this seems like the logical choice and you can but it’s just adding clutter. 

variable-group-pipelinevar-reference-per-stage

You can define them once and use Release for the scope and the variable groups use the scoped value per the stage during the release to each stage*.

variable-group-pipelinevar-reference-to-release

* I know someone reading this is saying BUT BUT if the variable name (Logging.LogLevel.Default) in the variable group matches with what is in your settings file you don’t have to reference it at all in pipeline variables.  Correct.  However, there are times you might have to due to a mismatch or as we have by convention chosen to.  You  might notice we start our variable reference with a caret ^.  This is part of the convention we have adopted. More on that in a later post

Overriding the Release scope

Now, what if you wanted to override a value for a stage that has a Release based scope?

Add the new pipeline variable, set the stage and set the value to override with.  The variable group value for the stage will be overridden with your new value.  This is a great option when you are deviating from your convention or need to have a different setting for a while.   It’s easy to cleanup.  Simply delete the pipeline variable for the stage when done.  We use this technique for a 3rd party vendor solution connection string that changes during their upgrade cycles.  During the upgrade timeline we override then go back to normal when the upgrade cycle completes.

override-variable-group-release-value

You can also mark the Release scope variable as “settable at release time” instead of creating a stage variable override like shown above.  It is “faster” and if one was doing it for quick troubleshooting, no problem.   For deviating from the normal/convention or prolonged usage I prefer an overridden stage variable.  The extra information provided by this tells anyone looking at the variables this isn’t “normal”.  It’s also less obtuse than having to view the logs of a release to see what the setting was set to at release time when using the “settable at release time” option.  

Never, mix the two approaches for the same variable.  The overridden stage variable will win which might feel counterintuitive.  I’ll explain more on our conventions around variable groups in a later post.

Learn More

Custom Variables and Scope
Variable Groups (Library)

It’s important to have everything possible defined in your release or in an Infrastructure As Code (IAC) process.   The holy grail is immutable infrastructure but that isn’t always possible and maybe not worth trying to achieve. We still have many on premise IIS virtual machines that host several applications and the IAC setup handles the basic setup and configuration of IIS and the Windows environment itself only.  Nothing for the applications.

In this situation, we have tried to setup our releases to be Application Infrastructure As Code (AIAC). If we have to move to another IIS environment we can change our deployment group and/or environment and deploy.  We get the added benefit of the release serving as further documentation to the requirements for the application that often go undocumented and makes for lift and shifts an exercise in frustration and rediscovery.  I call that application archeology.  Really not a position anyone wants to be in.

In an earlier post I described how one could add a separate virtual directory as part of the release.  A few of our applications also have file shares including a case where a virtual directory is also an upload folder for staff to include some very large files for the application to use.  Let’s get that into the release.

A PowerShell task is well suited to accomplish this.  I’ve included links in the Learn More section that goes over the nuances of file share rights and setup with PowerShell.

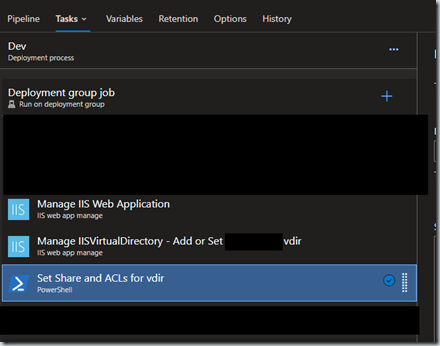
Create a PowerShell task that is after the task that creates the folder you want to share.  That’s about the only prerequisite.  It can go anywhere in the task step order otherwise.

share-management-ps-task

We chose to use the inline type with the below code:

$shareExists = Get-SmbShare -Name upload -ErrorAction Ignore

if($shareExists -eq $null)
{
   New-SmbShare -Name upload -Description "Upload For ABC App" -Path c:\somefolderpath
   Grant-SmbShareAccess -Name upload -AccountName domain\adgroup1 -AccessRight Change -Force
   Grant-SmbShareAccess -Name upload -AccountName domain\adgroup2 -AccessRight Change -Force
   Revoke-SmbShareAccess -Name upload -AccountName Everyone -Force
}
else
{
   Set-SmbShare -Name upload -Description "Upload For ABC App" -Force
   Grant-SmbShareAccess -Name upload -AccountName domain\adgroup1 -AccessRight Change -Force
   Grant-SmbShareAccess -Name upload -AccountName domain\adgroup2 -AccessRight Change -Force
   Revoke-SmbShareAccess -Name upload -AccountName Everyone -Force
}

$ACL = Get-ACL -Path "c:\somefolderpath"
$AccessRuleOwner = New-Object System.Security.AccessControl.FileSystemAccessRule("domain\adgroup1","FullControl","ContainerInherit,ObjectInherit","None","Allow")
$AccessRuleStaff = New-Object System.Security.AccessControl.FileSystemAccessRule("domain\adgroup2","Modify","ContainerInherit,ObjectInherit","InheritOnly","Allow")
$ACL.SetAccessRule($AccessRuleOwner)
$ACL.SetAccessRule($AccessRuleStaff)
$ACL | Set-Acl -Path "c:\somefolderpath"

First, we try to get the share and if it doesn’t exist we set it up (New-SmbShare) and then setup the rights to the share, not the underlying folder/files.  If it does exist, we update the share.  Then we setup the folder/files in the underlying path for the share’s access rights.  We have an “owner” we setup with full rights, say our team member’s group and then a second group that represents the users and carefully set them up with change rights to everything below the root path but not the root itself.

Share access rights and folder/file access rights are different and the most restrictive rights will win.

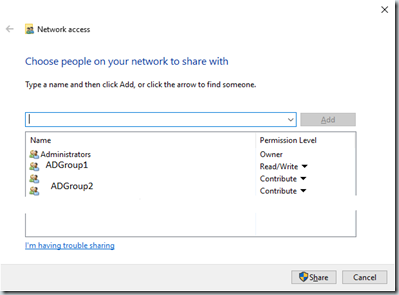
Share access for the adgroup2 will have contribute since they can’t modify the root path but adgroup1 has read/write since they can as we granted them full rights to the root and below.

Share rights

share-rights

Folder/File rights:

share-folder-perms

The PowerShell could be improved upon.  Instead of forcing an update we could interrogate the settings and only update if it’s changed.  Additionally, what if we wanted to use a new folder path or share name?  We’d want to add some concept of old/new and clean up after ourselves.  We didn’t do either in our case since these are long established paths and shares.  We don’t plan on changing them anytime soon and if we did the existing release is now clearly documented making it easy to amend for such a change.

Learn More

Managing Windows file shares with PowerShell
How To Manage NTFS Permissions With PowerShell
Differences Between Share and NTFS Permissions
NTFS ACL's: What is the difference between object and container inheritance?
ACL Propagation Rules
PropagationFlags Enum
InheritanceFlags Enum
Setting Inheritance and Propagation flags with set-acl and powershell

Using the  IIS web app manage task in Azure DevOps offers an easy and idempotent way of defining your web application on an IIS server.  You can think of it as Application Infrastructure As Code.  This task defines how the application should be setup/configured on an existing IIS server.  It allows for a deployment to a new IIS server to seamlessly work. 

What if you need to add a virtual directory as part of this setup?  An upload folder for example located outside the web applications virtual directory.

Let’s take a look at three options, using the “Additional appcmd.exe commands” in the IIS web app manage task itself, using a second IIS web app manage task or a PowerShell task.

Of these options the “Additional appcmd.exe commands” immediately seems the way to go since it’s part of the setup task for the web app.

TL;DR – Use a second IIS web app manage task for most cases.

Using the “Additional appcmd.exe commands” in the IIS web app manage task itself

I really want to like this option.  However, this option is too limiting to work for a scenario to add or change the virtual.  The IIS web app manage task itself is idempotent*.  It will add if an object doesn’t exist, change it if it does. * (maybe not fully idempotent…)

additional-appcmd

A naïve appcmd to use:

add vdir /app.name:”mywebsitename/mywebapp” /path:”/content” /physicalpath:"c:\somefolderpath”

This will work the first time but subsequent deploys will fail with duplicate collection element “/content”. 

You could change it to be a set statement but that will fail if the virtual directory doesn’t exist.

The text area only allows for appcmd commands but these commands can be piped together and the appcmd has the /in parameter to pass items to the next command in the pipe.  Since I’m trying to setup the release to be idempotent as much as possible this is looking a bit grim.

What about Pipes and /in for appcmd?

So, let’s see if the virtual exists and set it if it does.

list vdir /physicalpath:"c:\somefolderpath" /xml | set vdir /in /physicalpath:"c:\somefolderpath" /path:"/content"


Great, that works.  However, what if the virtual doesn’t exist?  This could be my own failing but it doesn’t appear possible to pipe this out in a way to add.  It also doesn’t appear possible to if/else to do a set or an add with pipes and the appcmd. 

What about piping to other functions? How about list piped to find with an or to add for the not found case.

list vdir /physicalPath:"c:\somefolderpath" | findstr "somefolderpath" || add vdir /app.name:"mywebsitename/mywebapp" /path:"/content" /physicalpath:"c:\somefolderpath"


You’ll get errors about invalid tokens.  You can only use appcmd commands in this text area.

While one can pipe appcmd’s together and use the /in parameter for input to the next pipe, the inability (or at least my inability) to change the appcmd from an add if the virtual doesn’t exist to a set if it does makes this a no go. 

What about Continue On Error and Run this task Even if a previous task failed combination?

Well, one could include add and set as two different lines in the text area and set Continue On Error for the task and a downstream task to run Even if a previous task failed.  However, this has the downside of hiding real errors with this task.  Plus, I can’t stand seeing the partially succeeded icon.  It always make me think something is broken and must be addressed.

PartiallySucceeded

I even tried to NUL out the output to swallow the error.

add vdir /app.name:”mywebsitename/mywebapp” /path:”/content” /physicalpath:"c:\somefolderpath” > NUL


No go, errors. So, at the moment, I don’t see this as a viable option for adding or setting a virtual directory.

Using a second IIS web app manage task

You can have more than one IIS web app manage task.  Let’s create a second one after the initial task to setup the web app.

On this task, select for the Configuration type, IIS Virtual Directory.

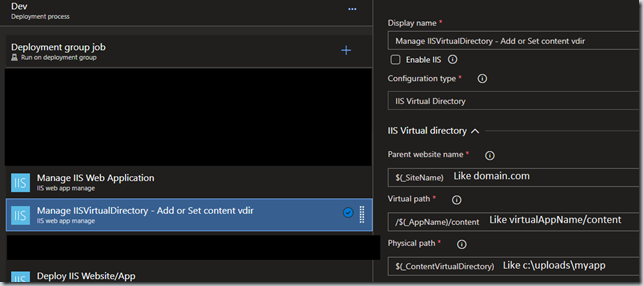
The parameters might be a bit confusing if you know you way around the appcmd but for the  parameters as used in above examples:

Parent website name: mywebsitename

Virtual Path: /mywebapp/content

Physical Path: c:\somefolderpath

manage-iisvdir-task

Since the task is smart enough to add or change we have achieved the desired result quickly and easily. 

YAML example

If you happen to be using YAML, below is the equivalent commands for the IIS Web App Manage Task:

- task: IISWebAppManagementOnMachineGroup@0
  displayName: 'Manage IISVirtualDirectory - Add or Set content virtual directory'
  inputs:
    IISDeploymentType: IISVirtualDirectory
    ParentWebsiteNameForVD: 'mywebsitename'
    VirtualPathForVD: '/mywebapp/content'
    PhysicalPathForVD: 'c:\somefolderpath'

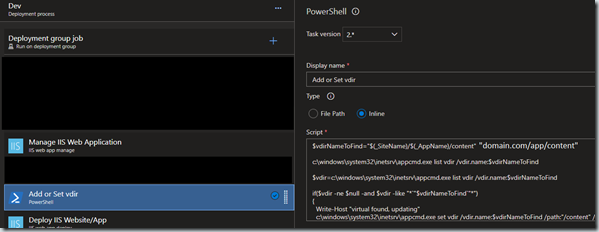
Using a PowerShell task

I like PowerShell.  I’m not the best at it but I use it often for automation tasks around DevOps.  So how would we accomplish with a PowerShell task.

The code below was heavily inspired by the source for the  IIS web app manage task.

$vdirNameToFind="mywebsitename/mywebapp/content"

c:\windows\system32\inetsrv\appcmd.exe list vdir /vdir.name:$vdirNameToFind

$vdir=c:\windows\system32\inetsrv\appcmd.exe list vdir /vdir.name:$vdirNameToFind

if($vdir -ne $null -and $vdir -like "*`"$vdirNameToFind`"*") # like needed as vdir name can match parent vdirs
{
   Write-Host "virtual found, updating"
   c:\windows\system32\inetsrv\appcmd.exe set vdir /vdir.name:$vdirNameToFind /path:"/content" /physicalPath:"c:\somefolderpath"
}
else
{
   Write-Host "virtual not found, adding"
   c:\windows\system32\inetsrv\appcmd.exe add vdir /app.name:"mywebsitename/mywebapp" /path:"/content" /physicalPath:"c:\somefolderpath"
}

powershell-vdir-task

The source from the IIS web app manage task has a far better flushed out solution so I recommend using the task but maybe one needs to do other work in the PowerShell task and having it all it scripted is desired.

Learn More

IIS Web App Manage Task
Getting started with AppCmd
Piping AppCmd

I ran into a bump when trying to pass variables around between PowerShell files in two tasks in the same job. I found the PowerShell task acts differently when using inline vs file path type.

Inline vs File Path

Set variables in scripts - Azure Pipelines | Microsoft Learn shows how to pass variables around between inline tasks in the same job. 

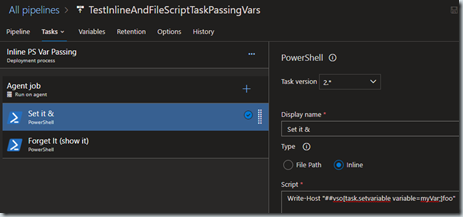
set it:

Write-Host "##vso[task.setvariable variable=myVar;]foo"

set-it-task-inline

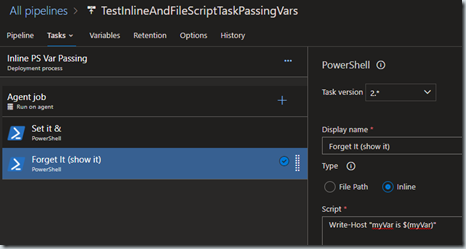
Subsequent inline tasks in the same job can use it:  Write-Host "myVar is $(myVar)"

show-it-inline-task

File Path Type

Referencing variables in File Path Type PowerShell Tasks changes slightly.  If you try to access the variable $(myVar) like the inline example you get an error: 

myVar : The term 'myVar' is not recognized as the name of a cmdlet, function, script file, or operable program.

There are two ways to accomplish this with the File Path Type.

Environment Variable

Use the environment ($env):

$env:myVar
Output Variable

Use an output variable and pass it as a parameter into the next script task.  This also works for tasks not in the same job.

The syntax to set the variable in the Set it step’s script file changes to:

Write-Host "##vso[task.setvariable variable=myVar;isoutput=true]foo"

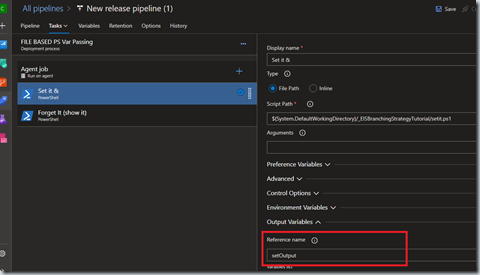
In the task, set the Reference name in the task to a name of your choosing.  I used setOutput.

set-it-task

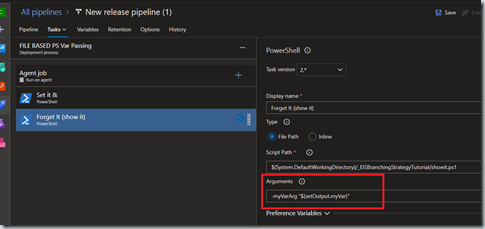
The consuming task, uses an argument in the consuming PowerShell file and uses the Reference Name from the previous task. If you called the argument in the PowerShell file $myVarArg then you pass it in –myVarArg “$(setOutput.myVar)”

showit-task

The PowerShell file needs to accept that parameter:

Param(

    [string]$myVarArg

)

Write-Host "myVar: $myVarArg"

See Classic release and artifacts variables - Azure Pipelines | Microsoft Learn for more information.

The advantage of the second option is that it also works between jobs.  If you are using the variables in the same job, consider using the environment variable.

<< Older Posts | Newer Posts >>